Hands-On: Panasonic 3D Ready Camcorder
October 20, 2011 by SmartReview
Filed under Camcorder Articles
Late this summer Smart-Review got to try out Panasonic’s TM90K 3D camcorder along with the optional VW-CLT1 3D conversion lens. Panasonic has 5 models of HD camcorders in 2011 that can be mated with this 3D Lens. These 3D camcorders have built-in software to work with the lens. In this article we will show you how a 3D conversion lens is fitted and adjusted to work with a Panasonic camcorder. What is nice about a 3D conversion lens is that it only needs to be attached when you need 3D. Adding an additional lens can make the camcorder bulkier. When the lens is off, you have your normal HD camcorder.
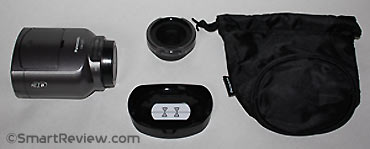
Panasonic VW-CLT1 (3D Conversion Lens)
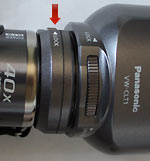
Step-up Ring Adapter
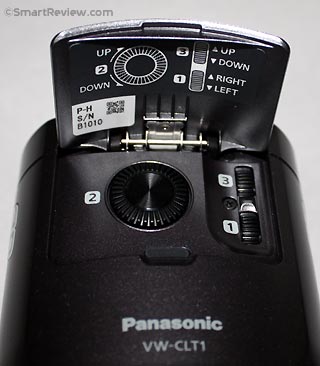
Lens Settings Panel
Adjusting the lens settings: Once the lens and camcorder are mated, you can now turn on the camcorder. The camcorder will sense that the lens is attached and go into 3D adjustment mode. The lens must be perfectly adjusted or you risk getting double images in your 3D videos. Panasonic tries to make this simple by having you go step by step using their help screens on the camcorder. The lens cap is translucent (allowing light to pass through) and has targets on it for alignment. There are three adjustment steps. The adjustments are done by lifting a pop-up panel on the lens which has three dials (see image on left).
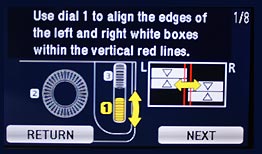
Lens Settings Screen
Watching your 3D Movies on a 3D TV: To watch video in 3D, you will need a 3D TV. You can connect the 3D camcorder to your 3D TV with a mini HDMI cord. Another way to view the movies are to copy them from your computer (after you download the videos to your computer with the included software from Panasonic) and put them on a USB thumb drive and plug them into your TV (If your TV supports USB and the movie format of these files). Or as we did, you can use a Sony Playstation 3 which supports 3D (with the latest firmware upgrade). When viewing these videos, you must set your TV to 3D mode and to the “Side by Side” method of 3D. The 3D conversion lens splits the view into two pictures (simulating your left and right eye). The 3D TV will take both images and combine them into one image, which the 3D glasses will then turn into a 3D image.
Related Article: 3D TV Buying Guide
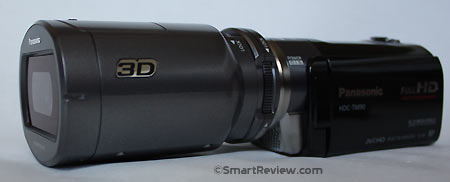
TM90 Camcorder Mated with Lens
Smart-Review Commentary: We believe that the Panasonic TM90k, TM900k are some of the best HD camcorders in 2011. The 3D conversion lens and 3D functions are a bonus. Our tests with the 3D lens produced videos with a good 3D effect for items within 20 feet of the lens. The one letdown was that the resolution of the video was much lower than full HD. This is a result of the lens splitting the resolution of the HD sensor in the camcorder in two. As such the video looked to us somewhere between VHS and DVD resolution. So, if you want to have fun with 3D, this lens is one of the cheapest ways to get 3D. Just be aware of the limitations. If you are serious about 3D, you may want to look at a dedicated full HD 3D camcorder. (These are bulky and cost a lot of money). The TM90k that we tested was an impressive camcorder for the money. The HD 1080p 60 frames per second (2D) video was smooth and extremely clear. We liked that it had an external microphone jack and accessory shoe for better sound. The 21x zoom lens was great.
** Also reviewed on this site is the Panasonic TM900k. This model has many upgraded features to the TM90k including manual functions, larger lens, 3 imagers versus 1 imager, better low light capability, and higher resolution LCD screen.
Replacement for the TM90K for 2013: Panasonic HC-V720K 3D Camcorder
Panasonic V700K Upgrade Option 2012: Panasonic HC-X900MK 3D Camcorder
Related Article: Best Rated HD Camcorders
